# Using Media Streams
### Media Surfaces
In order to make use of a [media surface](https://help.sansar.com/hc/en-us/articles/360000144963), you must set a Media Stream URL.
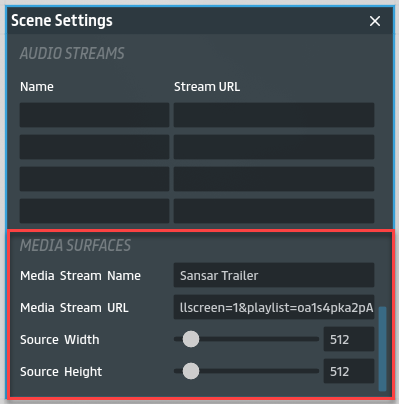
The Media Surface Settings section of the [Scene Settings panel](https://help.sansar.com/hc/en-us/articles/115003183343) allows you to set a media URL and set the location and volume of audio playback in the scene for that media URL.
Media Surface Settings in the Scene Settings panel.
***
You can adjust the following settings:
* **Media Stream Name** - Enter a name for the media stream. This is helpful for identifying the stream when setting up [audio emitters](https://docs.sansar.com/latest/creating-in-sansar/working-with-audio-and-video/audio-emitter) for positional audio.
* **Media Stream URL -** Enter the URL of a web page you would like to play in your scene. Note that the media only plays once and then stops unless otherwise specified by the URL. Read on below for more information on how to properly format a YouTube or a Twitch URL for media surfaces.
* **Source Width** - Set the height of the media, in pixels (e.g. 1920 for most 1080p videos).
* **Source Height** - Set the width of the media, in pixels (e.g. 1080 for most 1080p videos).
**Note:** In order to hear audio for a media stream, you must also set up an [audio emitter](https://docs.sansar.com/latest/creating-in-sansar/working-with-audio-and-video/audio-emitter) to play the audio portion of the stream.
Formatting a YouTube embed URL for media surfaces
YouTube (including live content) is officially supported for video playback. For the best playback experience, you need to format your **Media Stream URL** using specific flags:
* **`http://www.youtube.com/embed/[VIDEO_ID]?autoplay=1&loop=1&controls=0&allowfullscreen=1&playlist=[VIDEO_ID]`**, where \[VIDEO\_ID] is the unique ID for the video.
**Here are step-by-step instructions on how to construct the YouTube URL:**
1. Make sure to use the [embed](https://support.google.com/youtube/answer/171780?hl=en) link (only the part in quotes after "src=" in the Embed field).
2. Take note of the video ID, which is the text after the last forward slash in the embed link. For example:
| **YouTube Link** | **Video ID** |
| ------------------------------------------- | ------------- |
| | *oa1s4pka2pA* |
3. Add (with no space in between):\
\&#xNAN;**`?autoplay=1&loop=1&controls=0&allowfullscreen=1&playlist=`** after the embed link.
4. Then, add the video ID after that string. For example, the media URL for the Sansar trailer (with the video ID "`a1s4pka2pA`") would be: `https://www.youtube.com/embed/oa1s4pka2pA?autoplay=1&loop=1&controls=0&allowfullscreen=1&playlist=oa1s4pka2pA`
### Formatting a Twitch URL for media surfaces
Twitch is officially supported for video playback in Sansar. For the best experience, format your **Media Stream URL** as follows:
* **`http://player.twitch.tv/?channel=[CHANNEL_ID]&html5&volume=1`**, where `[CHANNEL_ID]` is the channel's unique ID.
* Alternatively, you can use **`http://twitchtheater.tv/[CHANNEL_ID]/c`**, where `[CHANNEL_ID]` is the channel's unique ID and `/c` hides chat. However, this link format also displays some of the website's user interface elements in the upper-right corner of the media surface.
### Audio Streams
You may use [audio emitters](https://docs.sansar.com/latest/creating-in-sansar/working-with-audio-and-video/audio-emitter) to play up to four different audio streams in an experience.
To set the audio streams for a scene:
1. While editing the scene, open the Scene Settings panel by choosing **Tools > Scene Settings**.
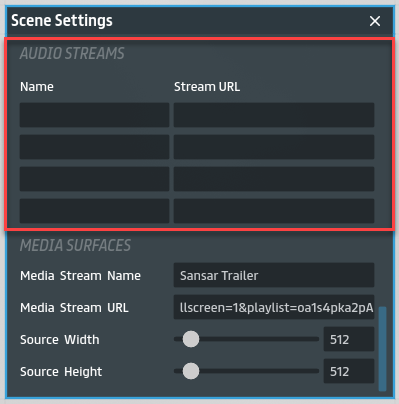
2. Under **Audio Streams** in the Scene Settings panel, enter info for up to four streams:
* **Name** - Choose a name for the audio stream. This is a useful identifier when setting up [audio emitters](https://docs.sansar.com/latest/creating-in-sansar/working-with-audio-and-video/audio-emitter) to play the stream.
* **Stream URL** - Set a URL for streaming audio content.
3. Place an [audio emitter](https://docs.sansar.com/latest/creating-in-sansar/working-with-audio-and-video/audio-emitter) in the scene, set its **Sound Source** to **Stream** in the Properties panel, and choose one of the audio streams from the **Stream** dropdown list.
Web audio streams in the Scene Settings panel.
***
### Previewing your media streams
You can preview your audio and media content by toggling **Audio/Video preview** in the **Options** menu while editing a scene. For more information on previewing media and audio in your scene, see [Previewing audio and video in a scene](https://help.sansar.com/hc/en-us/articles/115002178966).
Use Audio/Video preview to play your scene's media and sounds while editing the scene.
***
Known issues (March 20, 2018)
Media surfaces can occasionally fail to play back media. The workaround for this temporary issue is to force the stream to reload, as follows:
1. Enable **Options > Audio/Video preview**.
2. Verify that the media surface isn’t playing and remains white.
3. Disable **Audio/Video preview**.
4. Open **Tools > Scene Settings**.
5. Scroll down to **Background Sound** in the Properties panel.
6. Set **Sound Source** to **Stream**.
7. Choose an Audio stream (not the Media stream).
8. Save the scene.
9. Open **My Experiences** from the App Launcher and reload the scene by clicking **Edit this scene**.
10. Open **Tools > Scene Settings**.
11. Scroll down to **Background Sound** in the Properties panel and set it to the Media stream.
12. Save the Scene.
13. Enable **Audio/Video preview**.
14. Verify that the media surface is playing as intended.
You may need to repeat these steps multiple times before the media stream plays successfully.
***
#### Have more questions? Ask in our [Discord!](http://discord.gg/sansarofficial)