Sansar Docs
  • πŸš€Welcome to Sansar
  • πŸ“šGLOSSARY
  • 🎏Patch Notes
  • πŸ˜‡Work in Progress
  • ⚠️Creative Commons License
  • Support
    • General Troubleshooting
      • General FAQ
      • The Sansar Cache
      • The Sansar Log
    • Contact Support
  • Sansar Basics
    • Installation And Compatibility
      • Installing Sansar
      • System Requirements
      • Sansar Compatibility FAQ
      • Sansar on Mac
      • Body Tracking Vive
      • Configuring Firewalls
    • Account Management
      • Account Set Up
      • Avatar Name and ID
      • Adding Payment Method
      • Discord FAQ
      • Steam Integration
      • Subscription FAQ
    • Controls
      • Avatar Hand Gestures in VR
      • FreeCam and CineCam
      • Game Controller Buttons
      • HTC VIVE controls
      • Keyboard Shortcuts for Editing a Scene
      • Keyboard Shortcuts for Styling Your Avatar
      • Keyboard Shortcuts for Visiting an Experience
      • Mouselook Mode
      • Oculus Rift Controls
      • Vive Index Controls
    • Settings
      • General Settings
    • VR Settings
      • VR Settings Menu
      • Calibrating Height in VR
  • Exploring in Sansar
    • Navigate and Explore
      • The Codex
      • Instances
      • Interactive objects
      • The Main Menu
      • The Nexus
      • Portals
      • Quests
      • Quick Start: Exploring in Sansar
    • Socialize And Connect
      • Chat Panel
      • Experience Points, Levels, and Titles.
      • Finding People in Sansar
      • Identifying Interacting With Avatars
      • The People panel
      • User profiles
    • Attending events
      • Deploying Unpublished Event to Event World
      • Adding Events to Your Calendar
      • Attending Events in Sansar
      • Avatar Broadcasting FAQ
      • Creating Your Own Events
      • Redemption Codes
      • Tipping
    • Share Content
      • Streaming Sansar
      • Taking a photo
  • Avatar Creation
    • Avatar Basics
      • Avatar 2.0 FAQ
      • Customizing Your Avatar
      • Avatar Emotes
      • The Avatar Editor
    • Dressing The Avatar
      • Fitting Designer Clothing to your Avatar
      • Setting Custom Emotes
      • Wearing Accessories
      • Wearing Rigged Clothing
    • Managing Avatar Items
      • Importing Avatar-Related Items
      • Editing an inventory item's name
      • Editing an inventory item's image
      • Deleting avatar looks from your inventory
      • Importing a custom emote animation
      • Managing your avatar looks inventory items
    • Avatar Resources
      • Avatar Reference Files
      • Blender - Avatar files
      • Blender - Using Decimate Tool
      • Exporting Custom Avatars From Blender
      • Sansar Skeleton Skinning Details
      • Using Animation Skeleton
  • Creating In Sansar
    • Importing Things to Sansar
      • Supported file types
      • AABB Bounding Box and Item Restrictions
      • Importing Audio
      • Importing a Custom Avatar
      • Importing World Items
      • Importing Collision Volumes
      • Importing Accessories
      • Importing Clothing
      • Importing Emotes
      • Importing Hair
      • Importing Custom Scripts
      • Importing a Skybox
      • Troubleshooting Import Errors
    • Shaders and Materials
      • Shaders Information
      • Materials Information
      • VAT Shader Guides
        • VAT Shader Basics
        • VAT Technical Info
      • Displacement Guides
        • Simple Displacement
        • Advanced Displacement
    • Marvelous Designer Info
      • Marvelous Designer Integration
      • Marvelous Designer Creator Resources
      • Marvelous Import and Export
      • MD Limitations
    • Shader Scripting
    • Materials editing and shaders
    • Creator Tools
      • Creating a World
      • Creating Quests
      • Diagnostics Toolbar
      • Importing Items to Sansar
      • My Worlds Panel
    • Managing Worlds
      • Quick start: Creating experiences in Sansar
      • Deleting an experience or scene
      • Deploying a new scene to an existing experience
      • Editing a scene
      • Experience memos
      • Linking A Scene To A World
      • Managing your scenes and worlds
      • Moderation Tools for World Owners
      • Publishing Options for Your Experiences
      • Renaming a scene
      • Saving and Building A Scene
      • Sharing Your Experiences
      • Visiting your own experience
    • Part Of The World Editor
      • Object Stats Toolbar
      • Object Components
      • Parenting objects
      • Scene Item Inventory
      • Scene Objects Panel
      • Collision Volumes
      • Scene Settings
      • System objects
      • Object Motion Types
    • Working With Scripts
      • Working With Scripts
      • Working With Trigger Volume
      • Referencing Scene Components
      • Intro to Scripting in Sansar
      • Using the Script Console
      • Setting Script Parameters
      • Adding Scripts to an Object
      • Configuring Teleport Scripts
      • Simple Script User Guide
    • Working With Audio and Video
      • Working With Audio
      • Creating Media surface
      • Streaming Web Audio
      • Audio Emitter
      • Sansar Audio FAQ
      • Using Media Streams
      • Ambisonic Sounds
      • High Quality Spacial Audio
      • Audio Resource - Room Tones
      • Previewing Audio and Video in a Scene
      • Using Audio Materials
    • Working With Lights
      • Working With Lights
      • Light Types
      • Global Illumination
  • Sansar Store
    • Using the Sansar Store
      • The Sansar Store
      • Buying Items From The Store
      • Redelivering Lost Purchases
    • Buying and Selling Sansar Dollars
      • Gifting Sansar Dollars
      • Buying Sansar Dollars
      • Converting Sansar Dollars
      • Processing US Dollar Credit
    • Selling Your Content
      • Hidden Store Listings
      • Selling Items in Sansar Store
      • Selling Items in an Experience
      • Allowing Resale Of Items
      • Buyers Permissions
  • Guidelines and Moderation
    • Guidelines and Policies
      • Terms of service
      • Sansar's Discord Server Rules
      • Community Standards
      • Content Guidelines
      • World Publishing Guidelines
      • Store Listing Guidelines
      • Store Banner Guidelines
      • Event Guidelines
      • Privacy Policy
      • Sansar Freeware License Agreement
      • Intellectual Property Infringement Notification
      • Cookie Policy
    • Moderation and Reporting
      • Abuse and Griefing
      • Blocking Avatars
      • Muting Avatars
      • Reporting abuse
      • Reporting issues and bugs
      • Security issues
  • Script API Docs
    • General Information
      • External Script Repository's
      • Sansar Script API
      • Script API Updates
      • Restricted API's
    • Example Scripts
      • Example Scripts in Sansar
      • Cannonball
      • Follow The Path
      • Random Movement
      • Reflective Detector
      • Simple Script
      • Sound Randomizer
      • Stats Example
      • Teleport Hotkeys
      • Visitor Tracker
      • Mover Examples
    • Sansar Namespace
      • Namespace
      • Color
      • Mathf
      • Quarterion
      • Vector
      • Vector Extensions
    • Sansar.Script Namespace
      • AddEntryAttribute
      • CancelData
      • ComponentID
      • CoroutineException
      • Default Attributes
      • Editor Visible Attribute
      • Entries Attribute
      • Event Data
      • ICoroutine
      • IEvent Subscription
      • Instance Interface
      • Locked Attribute
      • Log
      • MaxEntriesAttribute
      • Memory
      • MinEntriesAttribute
      • NonReflectiveAttribute
      • ObjectID
      • OperationCompleteEvent
      • RangeAttribute
      • Reflective
      • Script.Base
      • Script Event Data
      • Script Handle
      • ScriptID
      • SessionID
      • Simple Script Event Data
      • ThrottleException
      • Timer
      • Tooltip Attribute
    • MetaData Namespace
      • Assembly MetaData
      • Script MetaData
    • Sansar Script Testing Namespace
      • Assertion Failure Exception
      • Assertions
    • Sansar Utility Namespace
      • GenericEnumerable <T>
      • GenericEnumerable<T>.GetItem
      • JSON Serialization Data
      • JSON Serialization Data 1
      • JSON Serializer
      • JSON Serializer Options
    • Sansar Simulation Namespace
      • Agent Info
      • Animation
      • Audio Component
      • Camera Control Mode
      • Character Tracker
      • Chat
      • Client
      • Cluster
      • Command Action and Data
      • Component Type
      • Control Point Type
      • Held Object
      • HTTP
      • Interaction
      • Light
      • Media Action
      • Mesh Component
      • Modal Dialogue
      • Move Mode and Mover
      • Objective
      • PlayHandle
      • PlaySettings
      • PlayStatus
      • Quest
      • RayCastHit
      • Rigid Body
      • Scene
      • Scene Public
      • Simple Script
      • Sit Event Type
      • Sit Object Data
      • Sound Resource
      • Stream Channel
      • Tutorial Hint
      • UI
      • User Data
Powered by GitBook
On this page
  • Materials editing and shaders
  • Materials editing and shaders
  • Accessing Materials Settings
  • Access Materials Settings when uploading an object in edit mode
  • Access Materials Settings for an object that is already in a scene
  • Loaded materials
  • Shader Setting
  • Applying maps
  • Tips
  1. Creating In Sansar

Materials editing and shaders

PreviousShader ScriptingNextCreator Tools

Last updated 6 months ago

Materials editing and shaders

Materials editing and shaders

Instead of using the in your 3D modeling tool, you can use the Materials Settings panel to apply shaders and texture maps to objects.

Accessing Materials Settings

Access Materials Settings when uploading an object in edit mode

  1. Click Import > 3D Model in the top toolbar. See .

  2. When the Import 3D Model panel appears, you will need to select a .fbx file first to upload. Under 3D model file, click Browse and choose a 3D model (.fbx or .obj) from your computer.

  3. Once a file is selected, click the Materials Settings button to access the Materials Settings panel.\

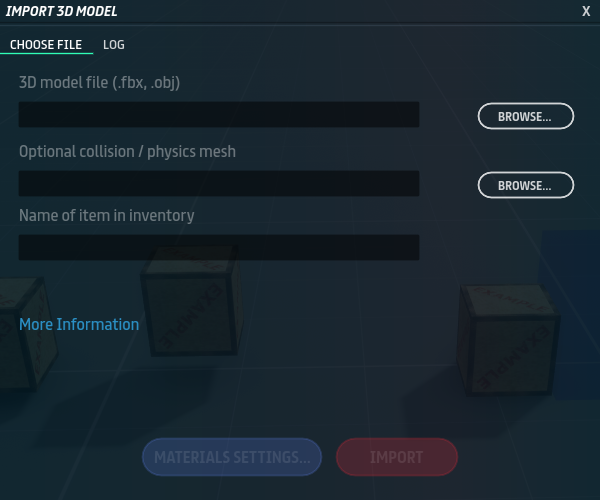
    The upload panel once a .fbx file has been selected from your local drive.

Access Materials Settings for an object that is already in a scene

You can access Materials Settings on objects that have been placed in a scene. Note that you cannot currently take objects from a scene back into your inventory, so there is no way to save and reuse changes you make to an object in this way:

  1. Find the object in the Scene Objects panel.

  2. Right-click the object's name and choose Materials...

Note: When changing materials settings for an object that is already in a scene, those changes are previewed on the object. The changes are reverted if you close the Materials Settings panel by clicking Cancel.

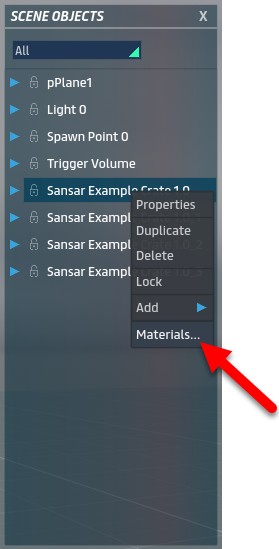
Accessing the Materials Settings panel for an object that is already in the scene.

Materials Settings panel overview

The Materials Settings panel.

Loaded materials

The Loaded materials list shows the materials applied to the model at the time of upload. If no materials are assigned, a single default material is applied to all parts of the model. Select each material to assign a shader and texture maps to each.

Shader Setting

The Use shader dropdown lists all shaders that can be applied to the currently selected object part. Each shader is ideal for a different application, and comes with its own subset of possible texture maps.

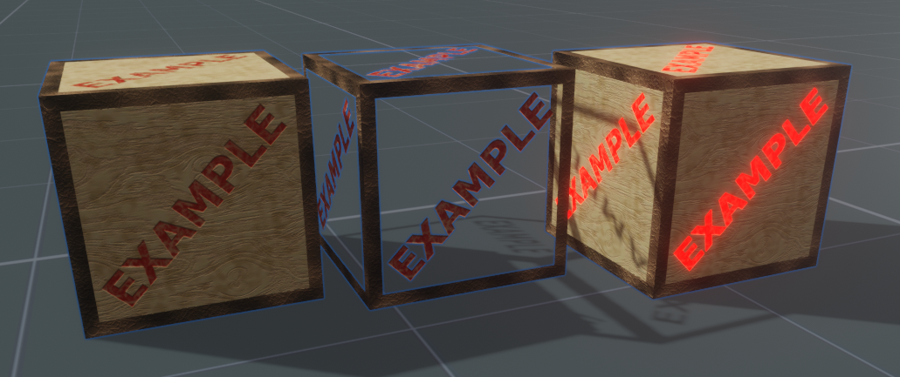
Example usage of Standard, Standard+Alpha Mask, and Standard+Emissive shaders.

Applying maps

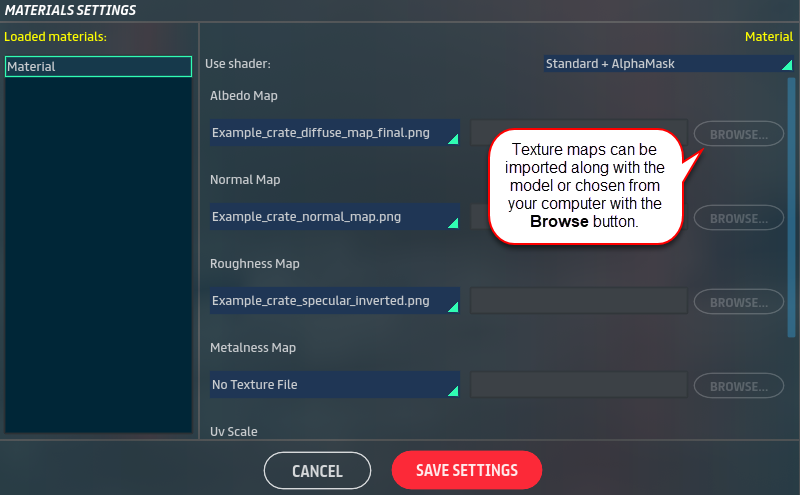
Choose one of the object's existing texture maps or click the Browse button to choose one from your computer.

For each kind of map supported by a shader, you may choose any of the object's existing textures from the dropdown, or choose Custom Texture File. If you choose a custom texture, click Browse to choose a suitable texture from your computer to use as the map.

Tips

Here are a few tips to help you get the most out of Shaders and Materials

  • The maximum texture resolution is 4096 x 4096 pixels.

  • When in doubt, use the simplest shader you can. If you don't need an alpha mask, don't use a shader with that feature. The Standard shader is the fastest, most efficient shader available.

  • Sansar uses a custom physically based renderer (PBR) and doesn't use specular maps. However, Sansar does use roughness and metalness maps to define the specular highlights of an object.

  • When applying maps on an object that is already in the scene, a preview of the result is shown on the object in the scene. If you choose to cancel your changes, the object reverts back to its previous maps.

Known changes

  • As of July 18th, 2018, the Tint attribute, which affects the color of a surface, now affects emissive surfaces. Previously, Tint attribute only affected non-emissive surfaces. This means that emissive textures (e.g. a light bulb) can now be colored via β€œTint”. However, these changes may affect existing content where the Tint value had been changed from the default value.

For a full list of available shaders and some suggested uses, see .

Phong shader
Uploading items in Sansar
Shaders