# Marvelous Import and Export
### Exporting from Marvelous Designer 9
Once you have your clothing item made this guide will help you to get your file ready for exporting from MD to then import into sansar and for texturing externally in programs like substance painter.
**NOTES:**
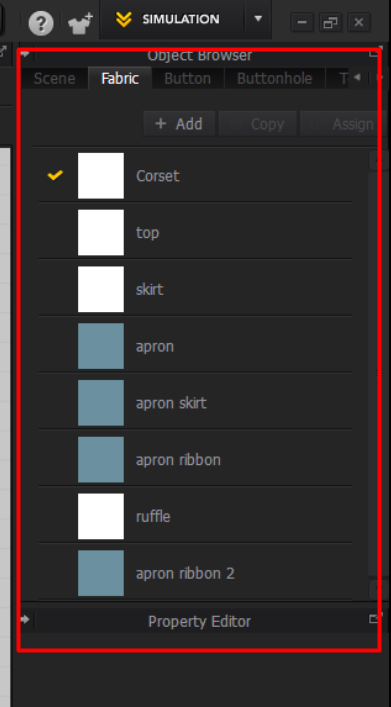
* Sansar only allows 1 material slot for MD based items so all of your materials (fabrics) will be combined into one set of Texture maps when exported so make sure you have no overlapping parts you need to texture separately.
* Fabrics slots will still retain any individual settings the fabric itself had so even though they will be combined into a single map the individual cloth settings will remain. See [MD Limitations](https://docs.sansar.com/latest/creating-in-sansar/marvelous-designer-info/md-limitations) for more info.
* If you edit your pattern in any way you will need to repeat the UV alignment steps.
***
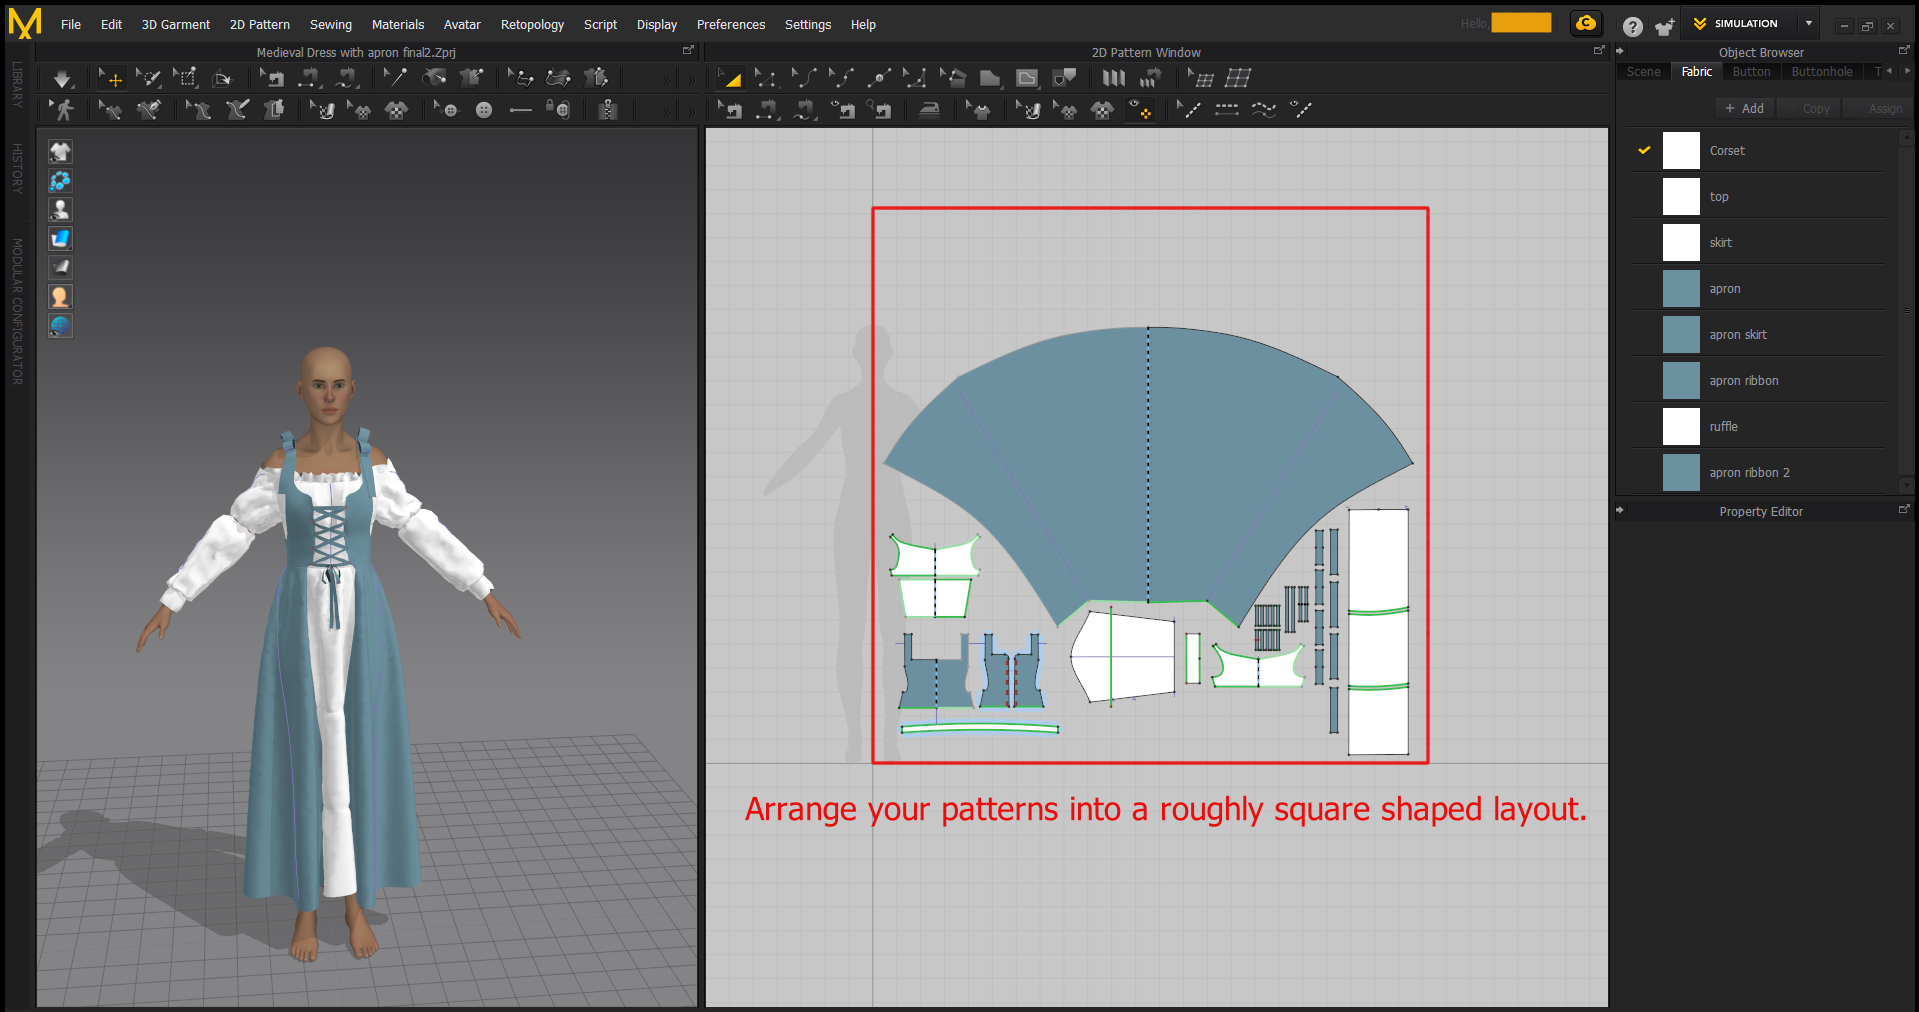
### Step 1: Arrange your patterns.
You need to arrange your patterns as best you can into a square shape, as MD's 2d window also effects the size of the actual mesh just arrange them the best you can without resizing, you are ok to move and rotate and also make sure nothing is overlapping and has a bit of room 'Padding' around each part.
***
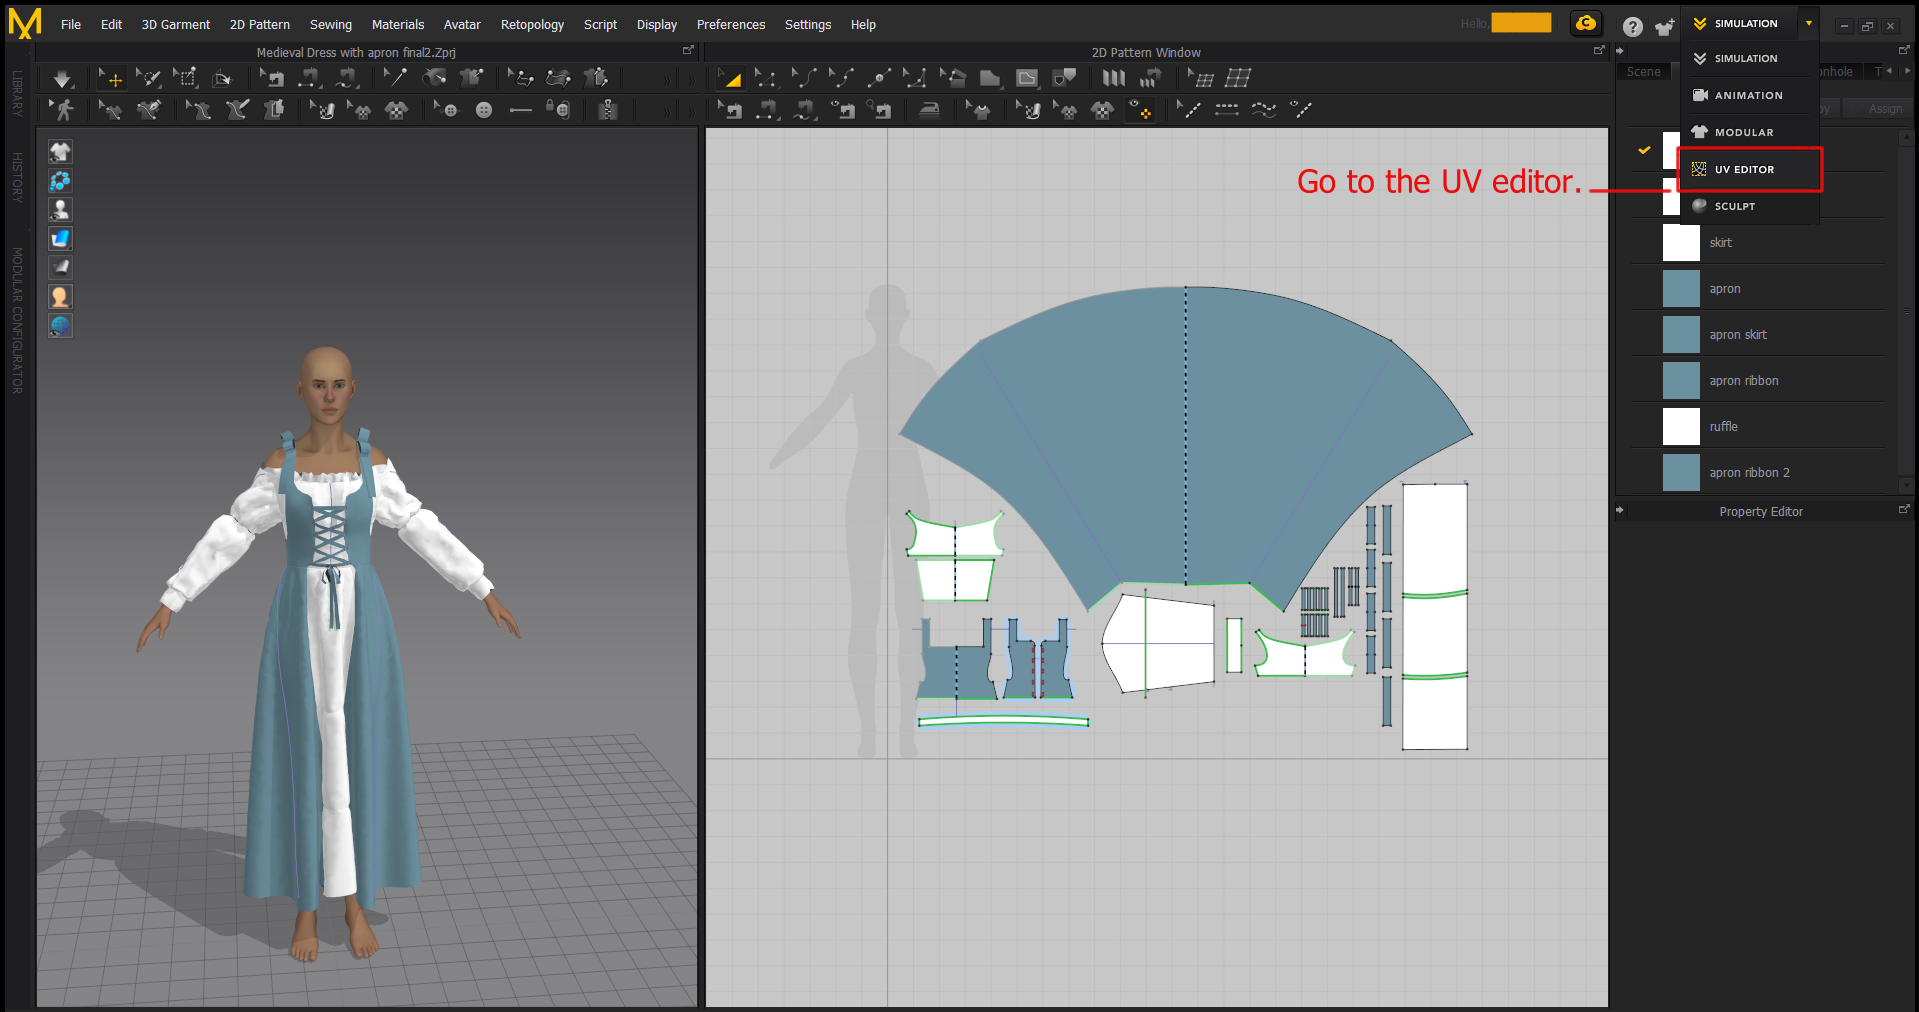
### Step 2: Setting up the UV alignment.
Open the 'UV Editor' window from the top right menu
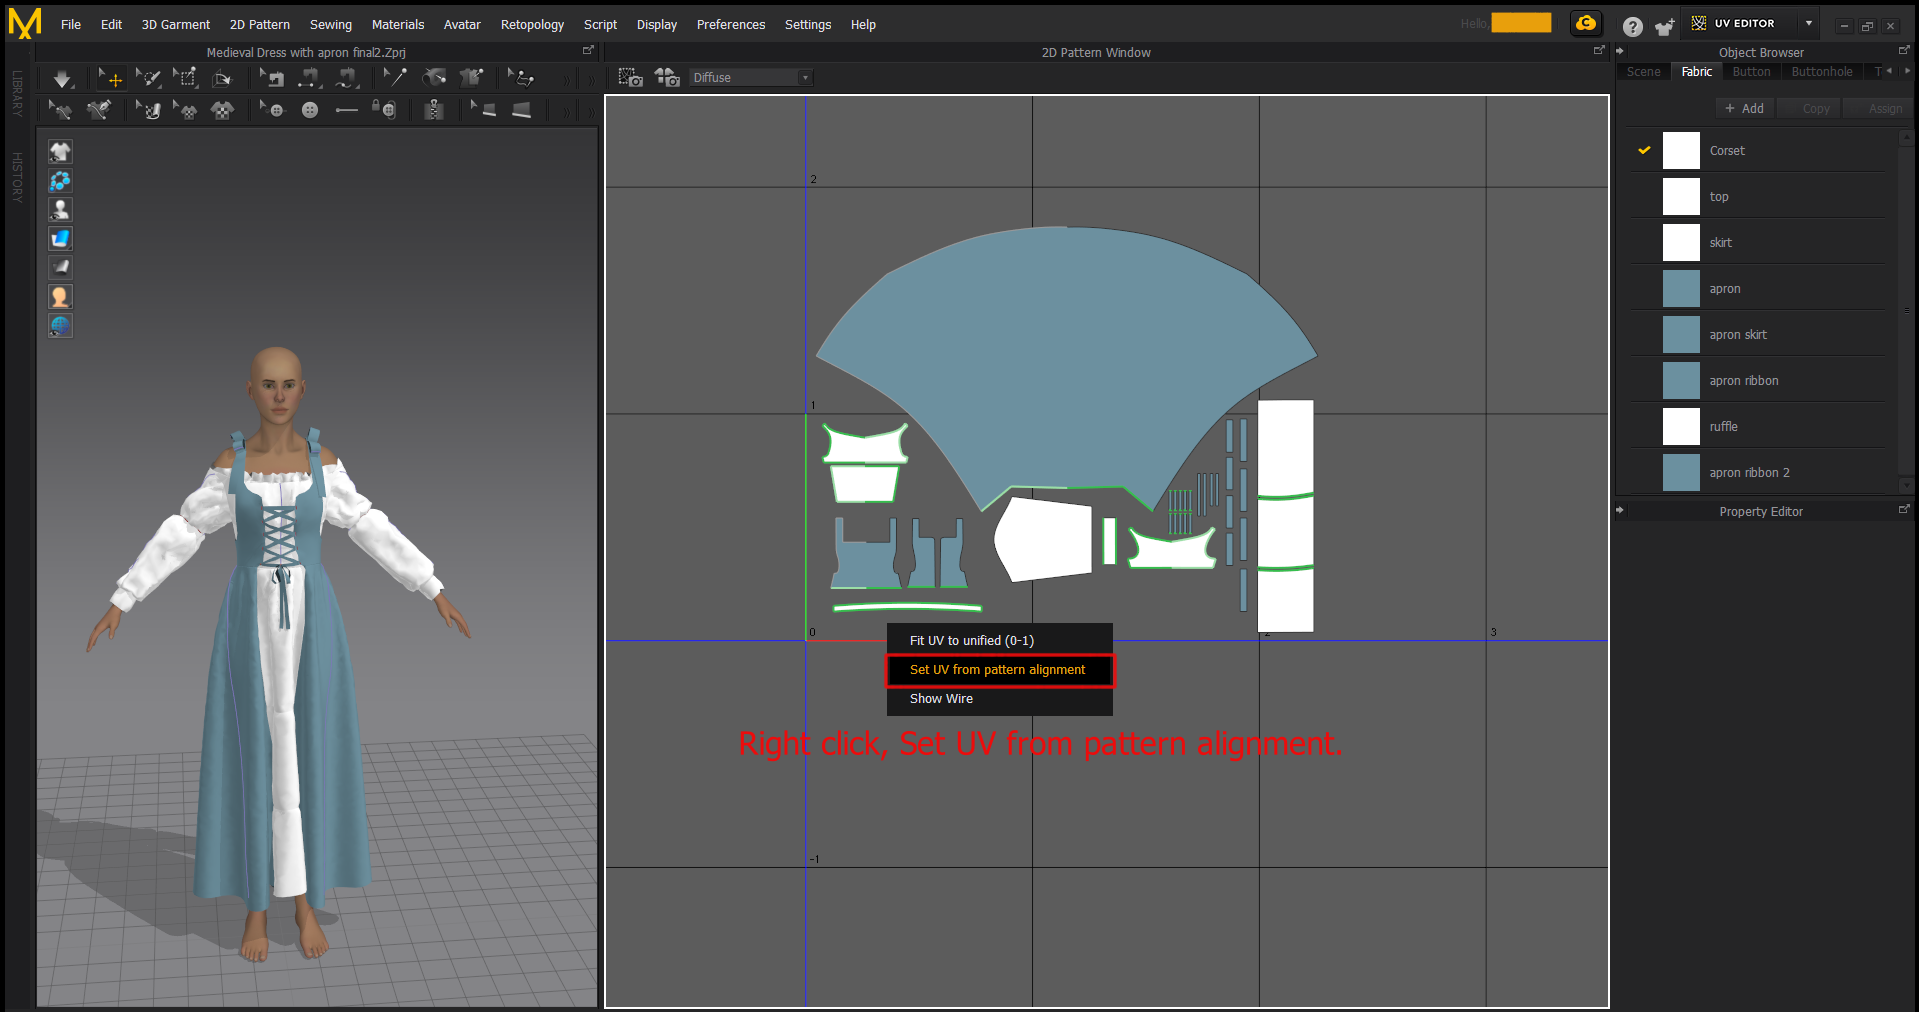
In the UV Editor window, Right click, then 'Set UV from pattern alignment' Your map may be in a different position than shown as it is based on its positioning in the 2D window, but will be fixed by the next step.
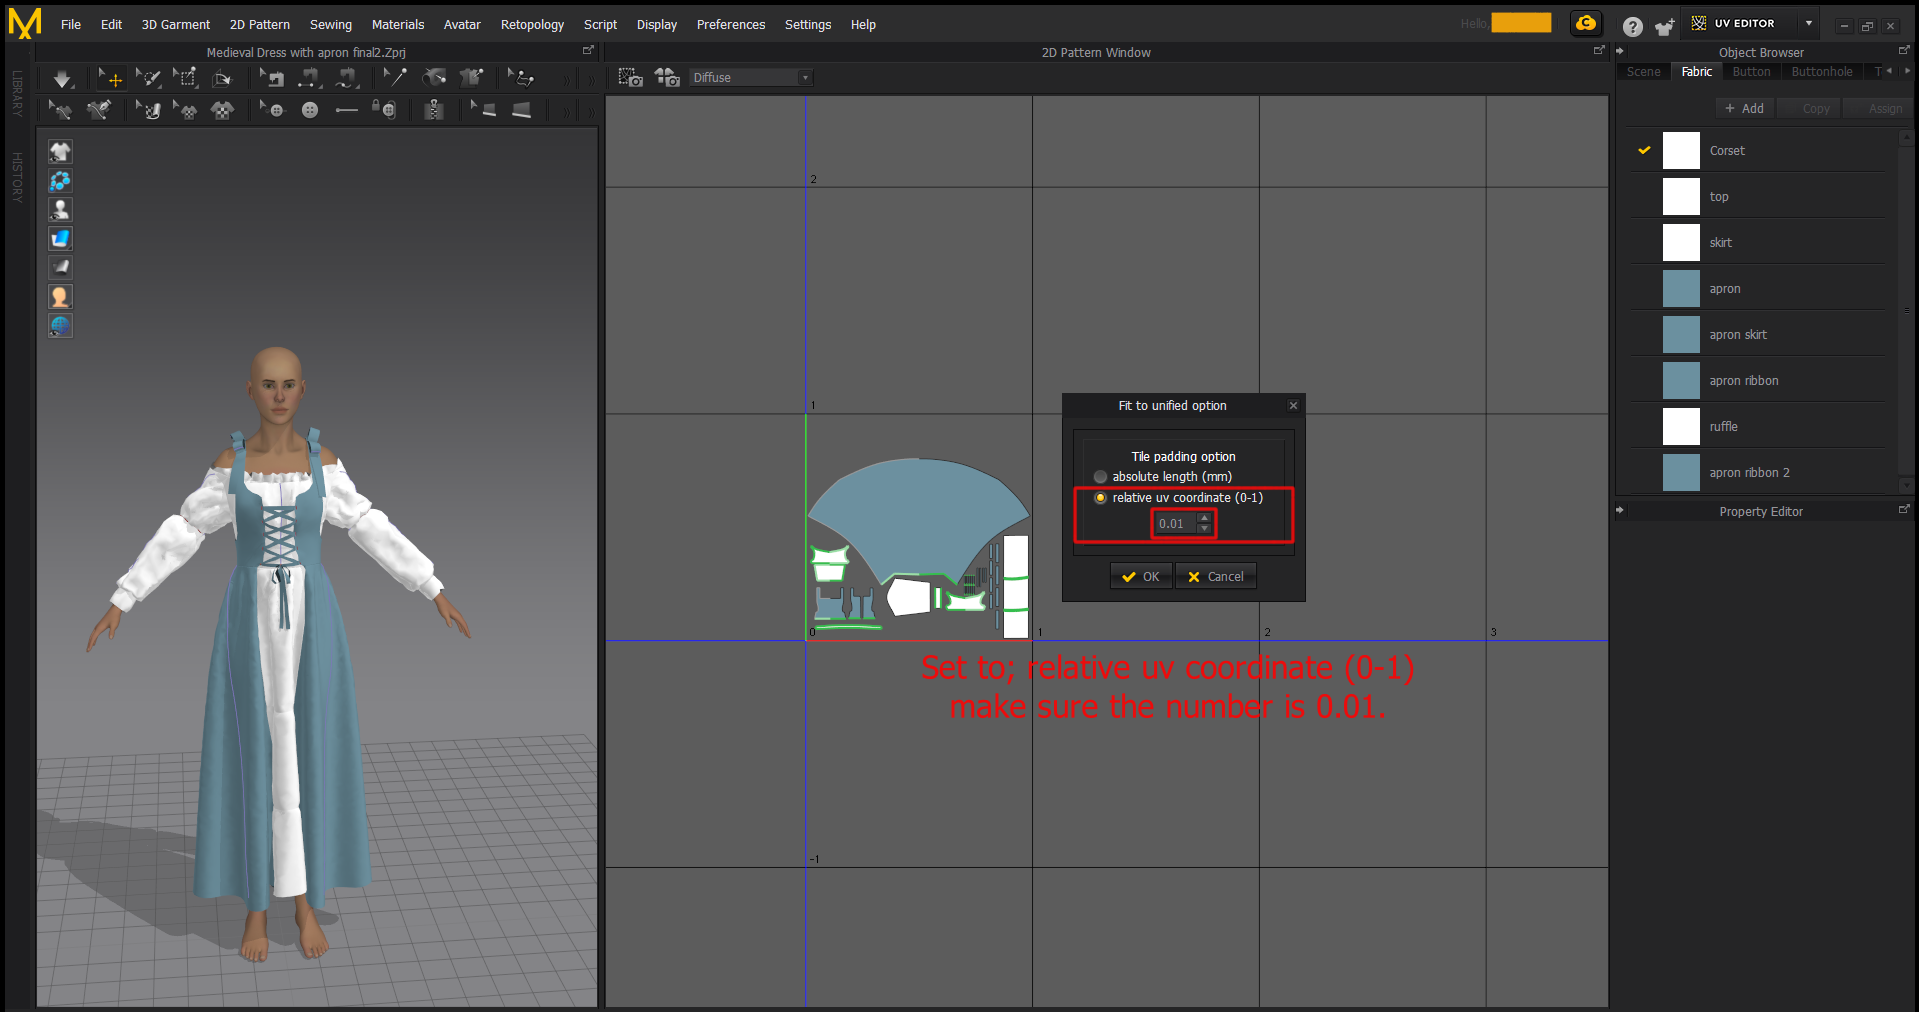
Now Right click again, and select, 'Fit UV to unified (0-1)'
In the next box that pops up: Set to; relative uv coordinate (0-1) make sure the number is 0.01. and this should fix the positioning.
### Step 3: Create a save point!
After completing these steps make sure to create a save at this point in case you need to return as exporting can sometimes cause a crash in MD. If you edit the patterns in any way these previous steps will also need to be redone.
You are now ready to export your files a .SAMD for import into sansar and a .FBX for use in texturing that can also be uploaded to edit mode to use as a display item (it is recommended to optimize this mesh if using for edit mode).
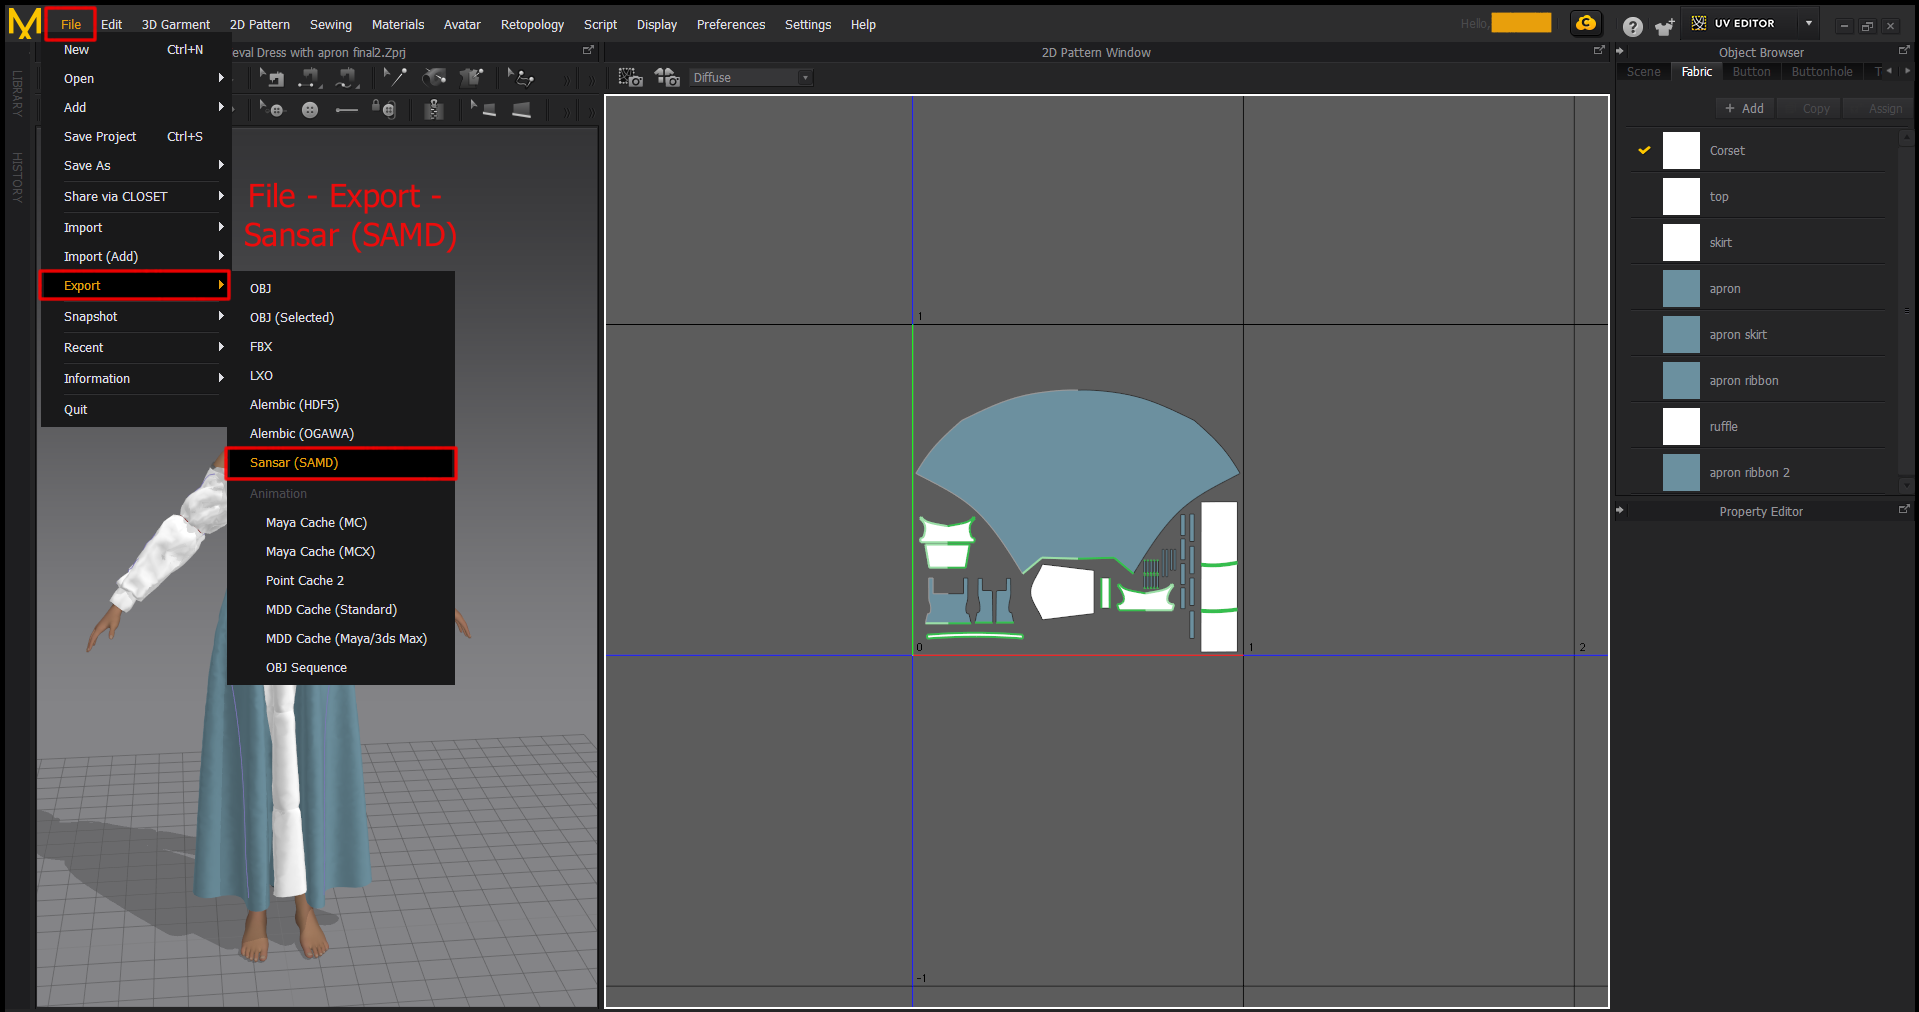
### Step 4: Exporting your .SAMD file
MD will automatically pack all fabrics into one material slot for the .SAMD
On the top left Click File > Export > .SAMD and select your desired location.
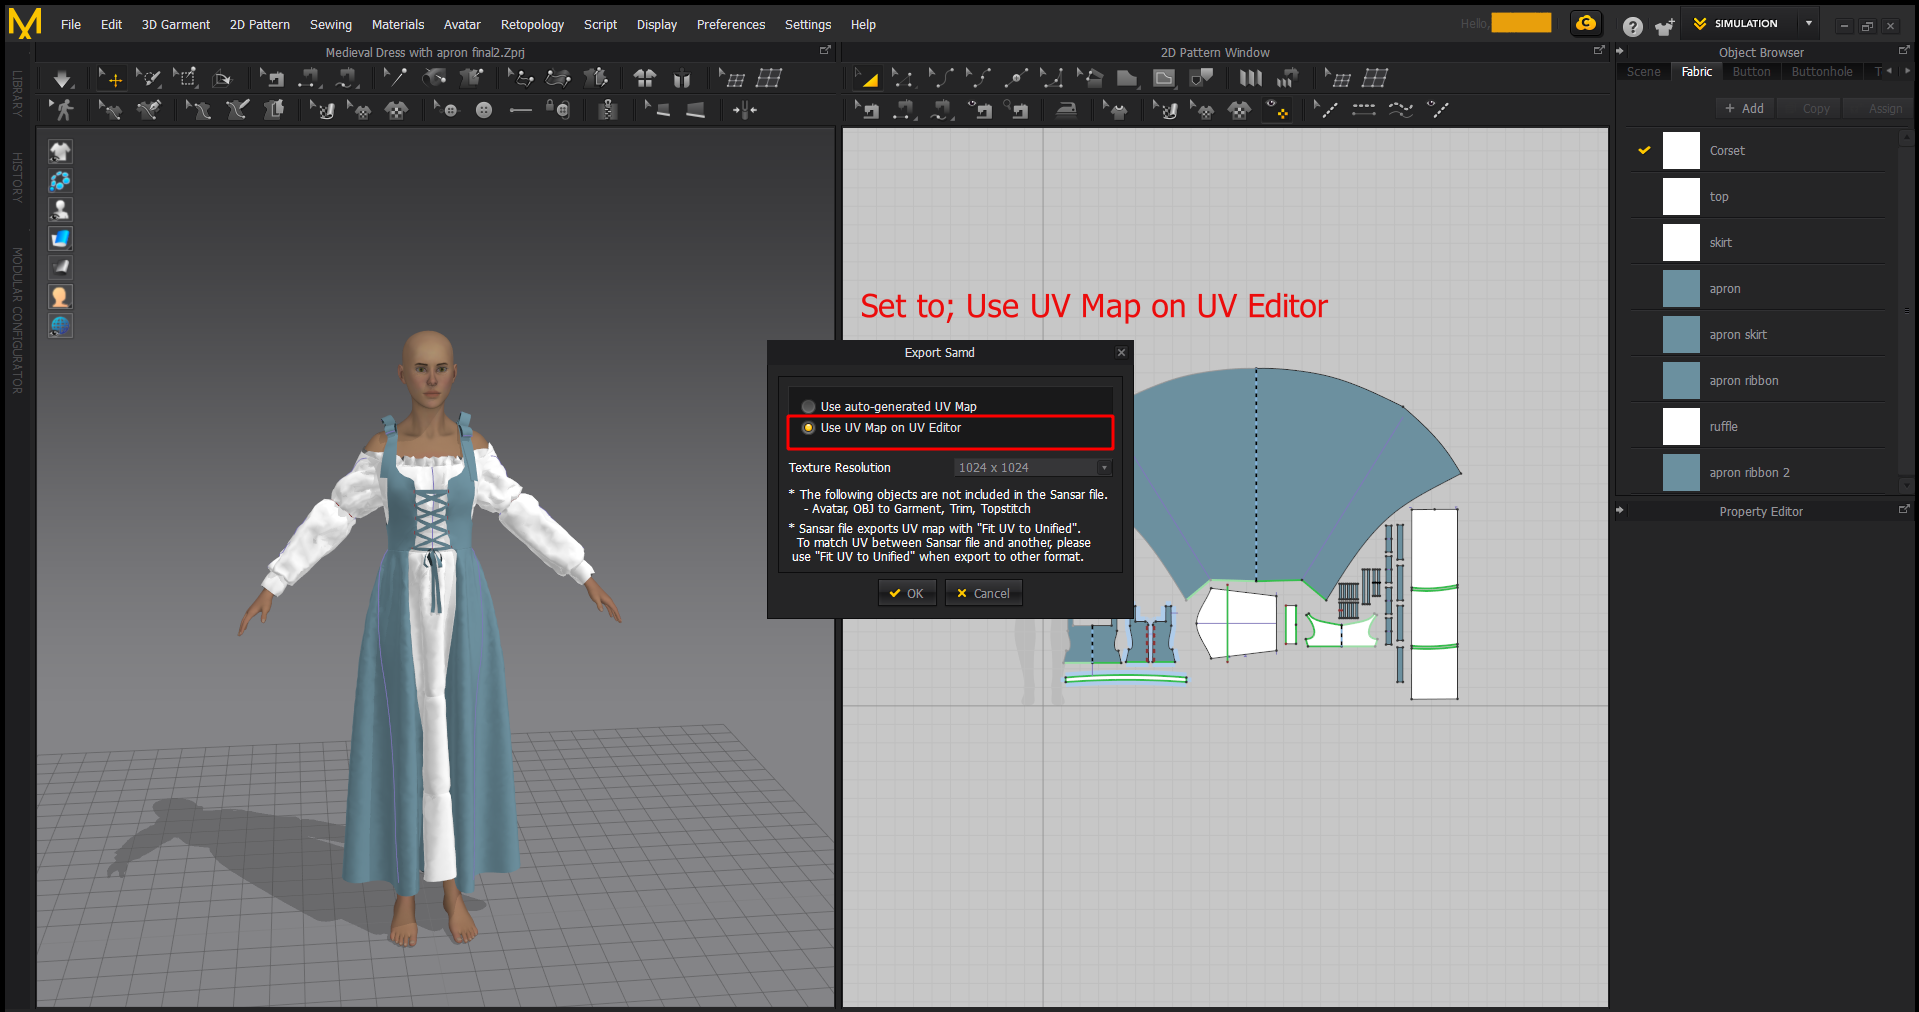
Now Set to; Use UV Map on UV Editor, Then Click OK
You have now created the .SAMD file you will use to upload into sansar.
If you have done your texturing in MD it may work but is usually not a good match in sansar and it is recommended to create your textures separately.
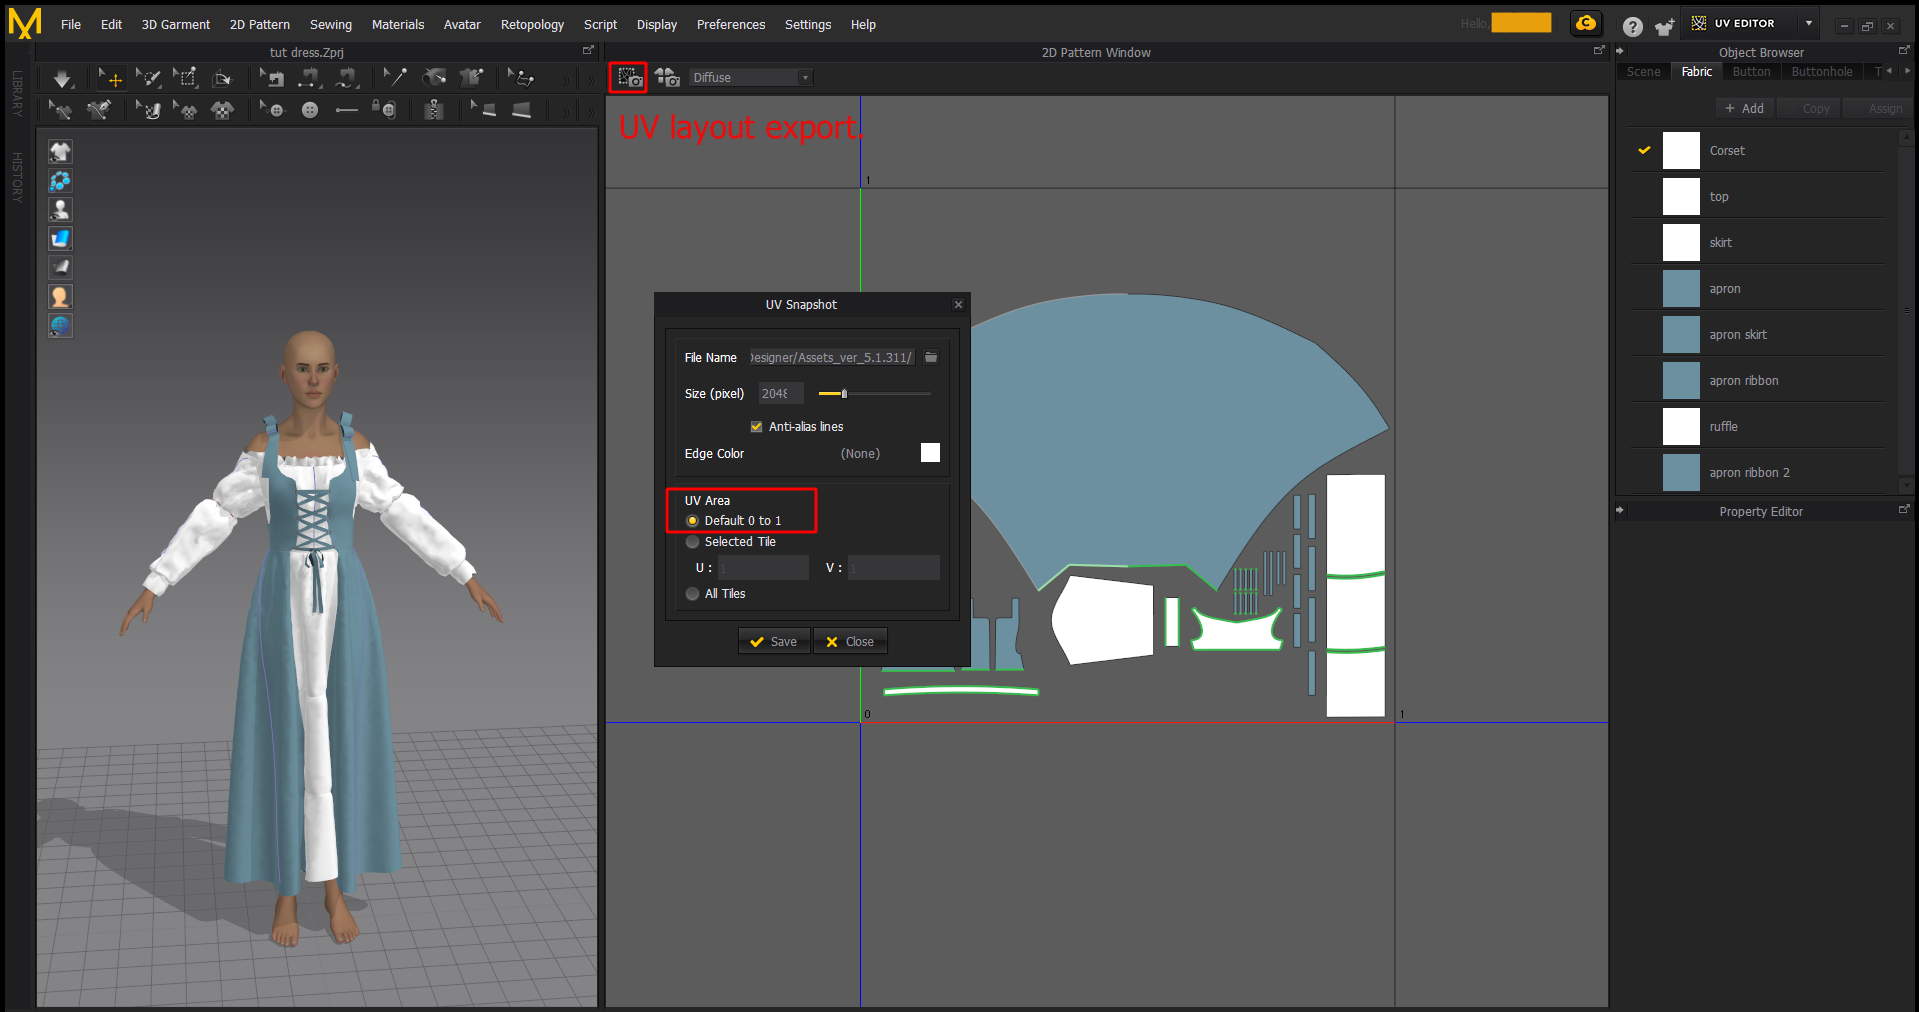
### Optional: Exporting a UV map for 2D texturing
If you are texturing manually with 2D maps you can export a UV layout to make it easier to line up your texture in a image editing program.
In the 'UV Layout' window at the top left click the 'UV Snapshot button'.
Choose your Path, Your desired texture image size (2048 is fine most of the time) and make sure your UV area is set to (default) 0 - 1.
### Step 5: Exporting a .FBX from MD for texturing
**NOTES:**
* When Exporting a .FBX for texturing if you have more than one fabric (material) you may need to combine them into a single slot once exported, this is easier to do externally in blender rather than changing your MD projects file.
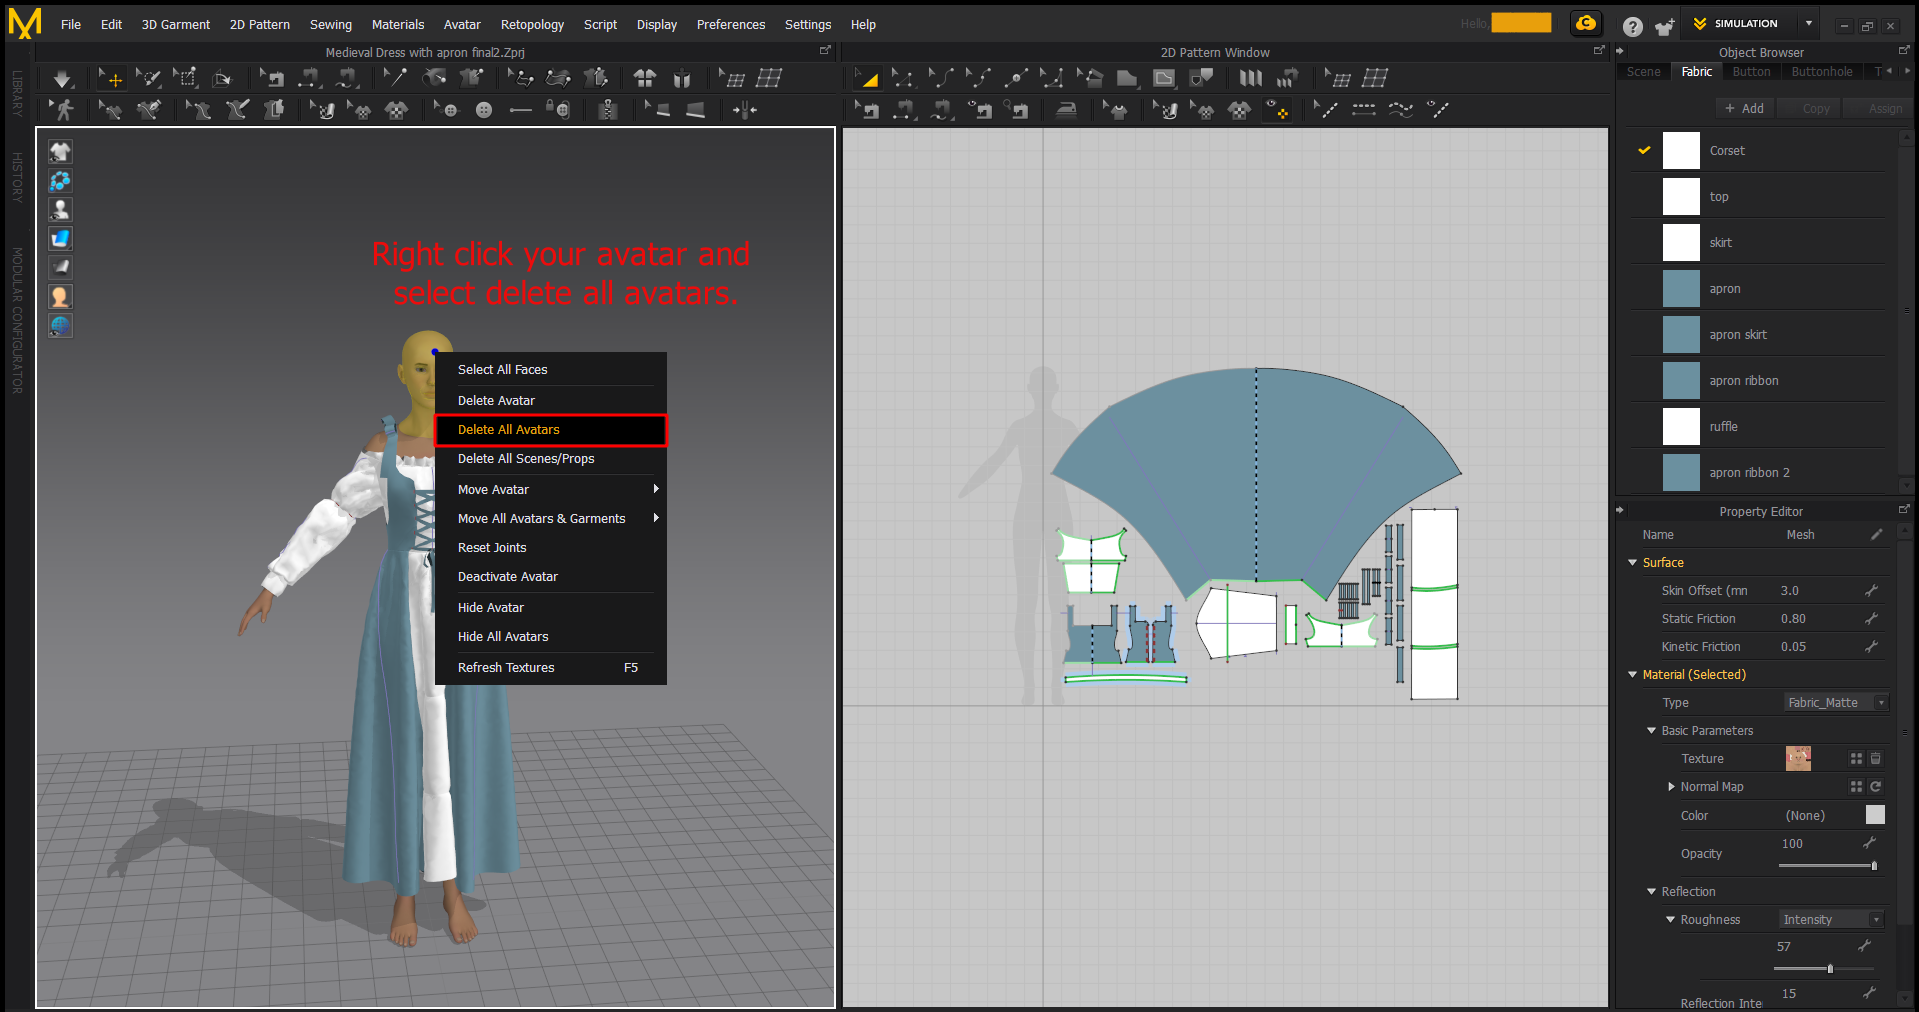
* If you just require the garment for texturing you need to temporarily delete the Avatar from the scene otherwise it will be exported also. later versions of MD have this as a option on export.
***
In the Simulation window **Right Click** the avatar and select 'Delete all Avatars'
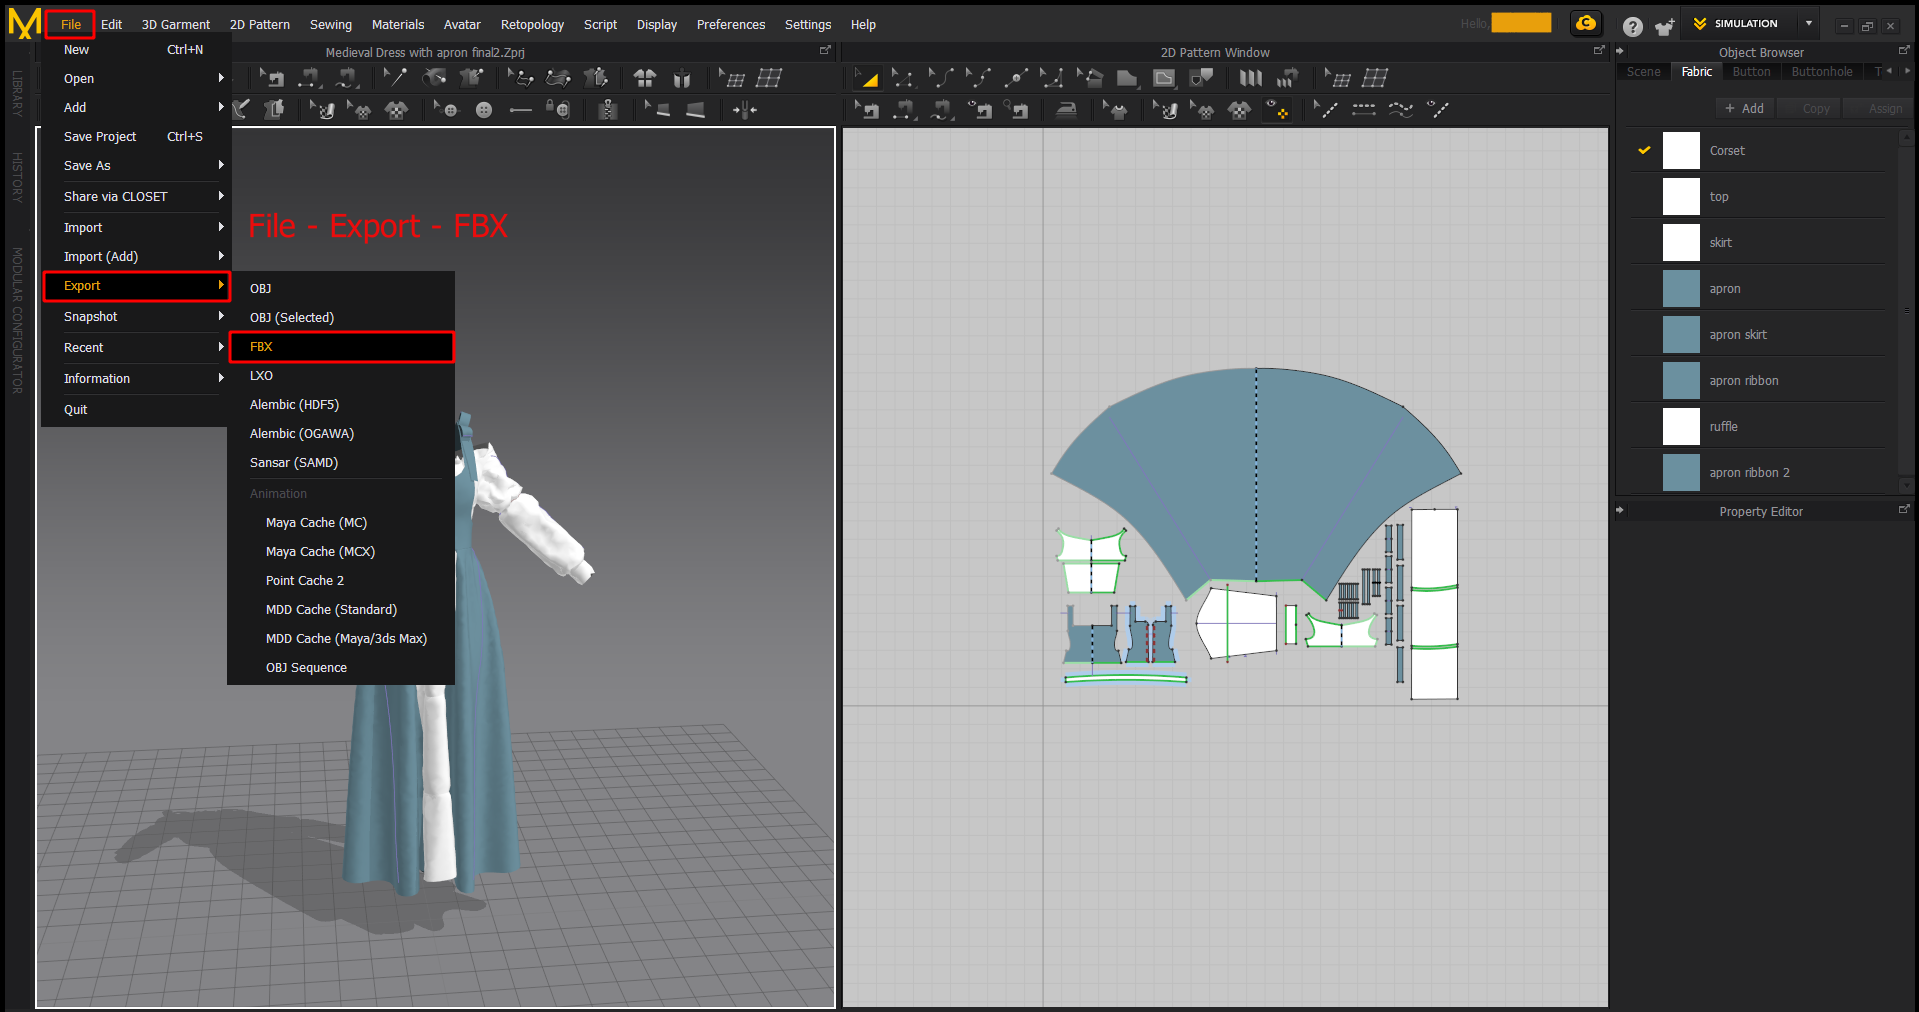
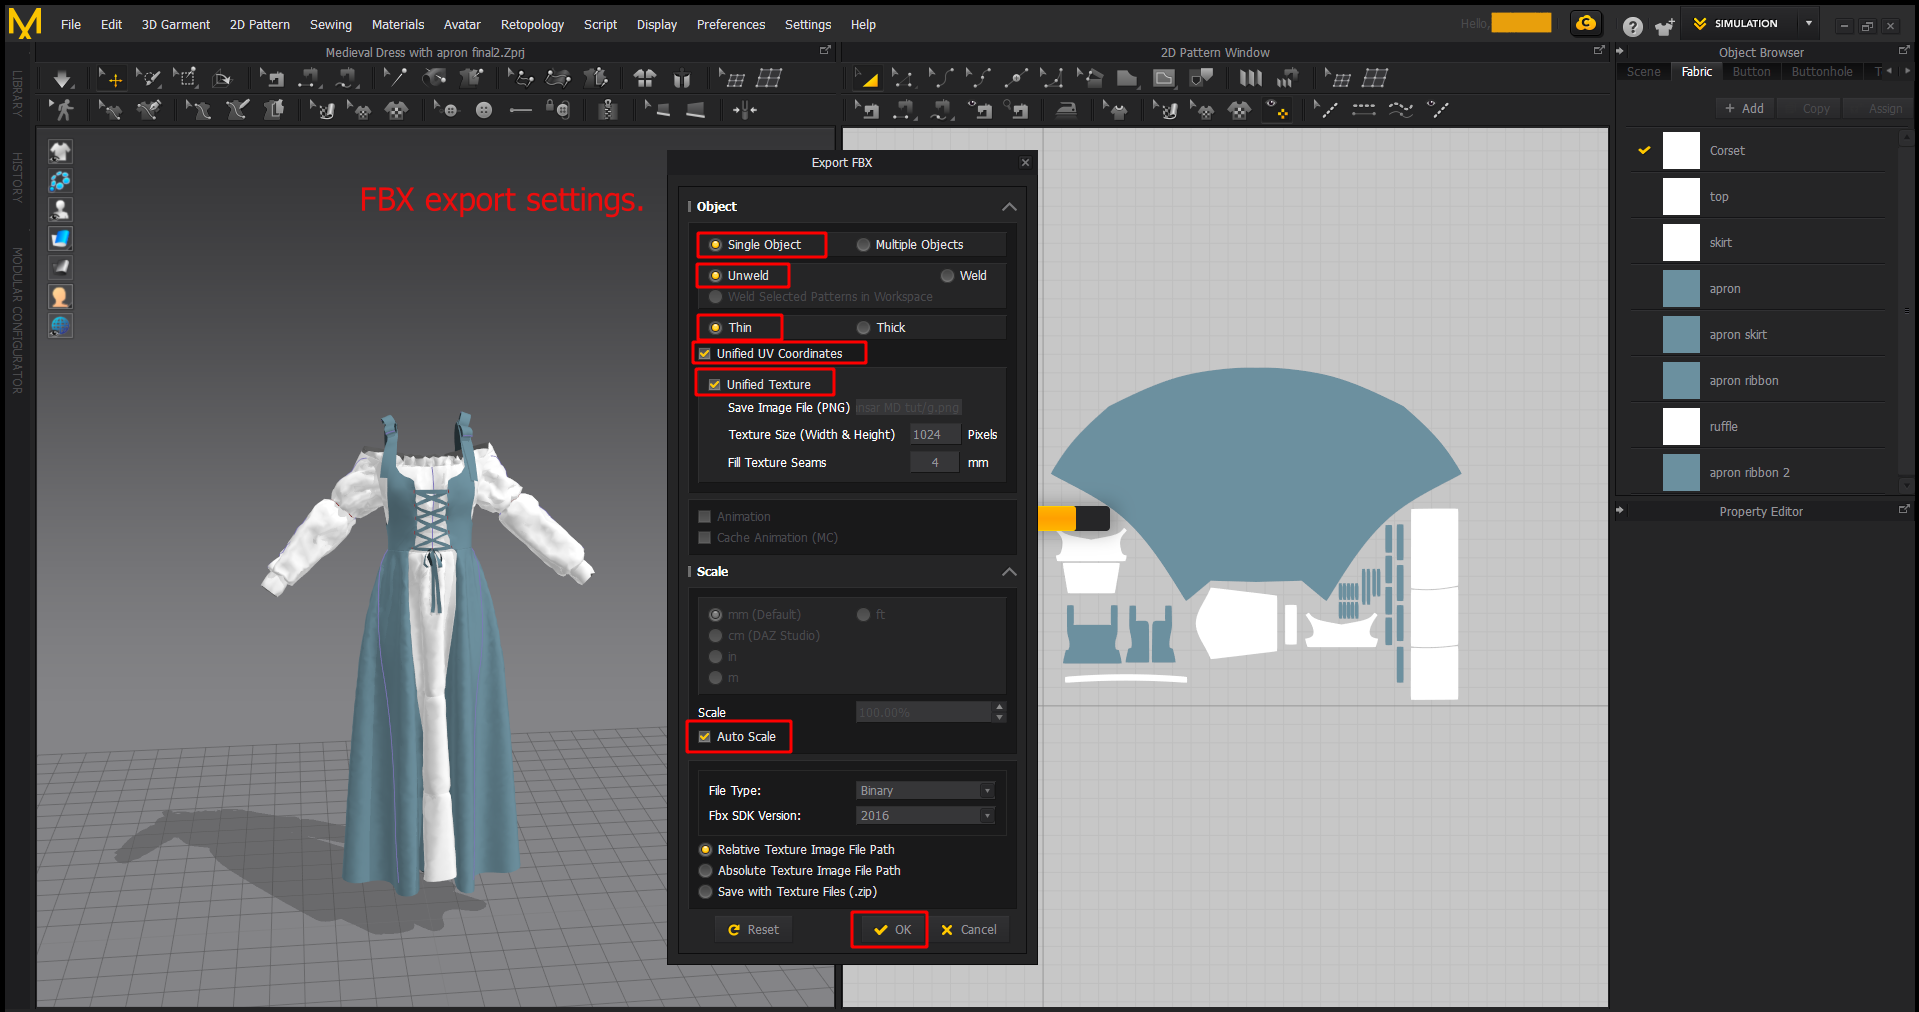
With just the garment in the scene at the top left, go to File > Export > FBX and choose your desired location.
Selecting the following settings
* **Single Object** - combines the mesh into a single object.
* **Thin** - sansar only accepts thin.
* **Unweld** - doesn't combine seams vertex'and gives better shading.
* **Unified UV coordinates** - exports the UV in 0 - 1 range.
* **Fill Texture Seams** - set to about 4mm this is texture padding.
* **Unified Textures** - combines any separated texture uv's into one (doesn't combine materials)
* **Auto Scale** - matches the scale you patterned with.
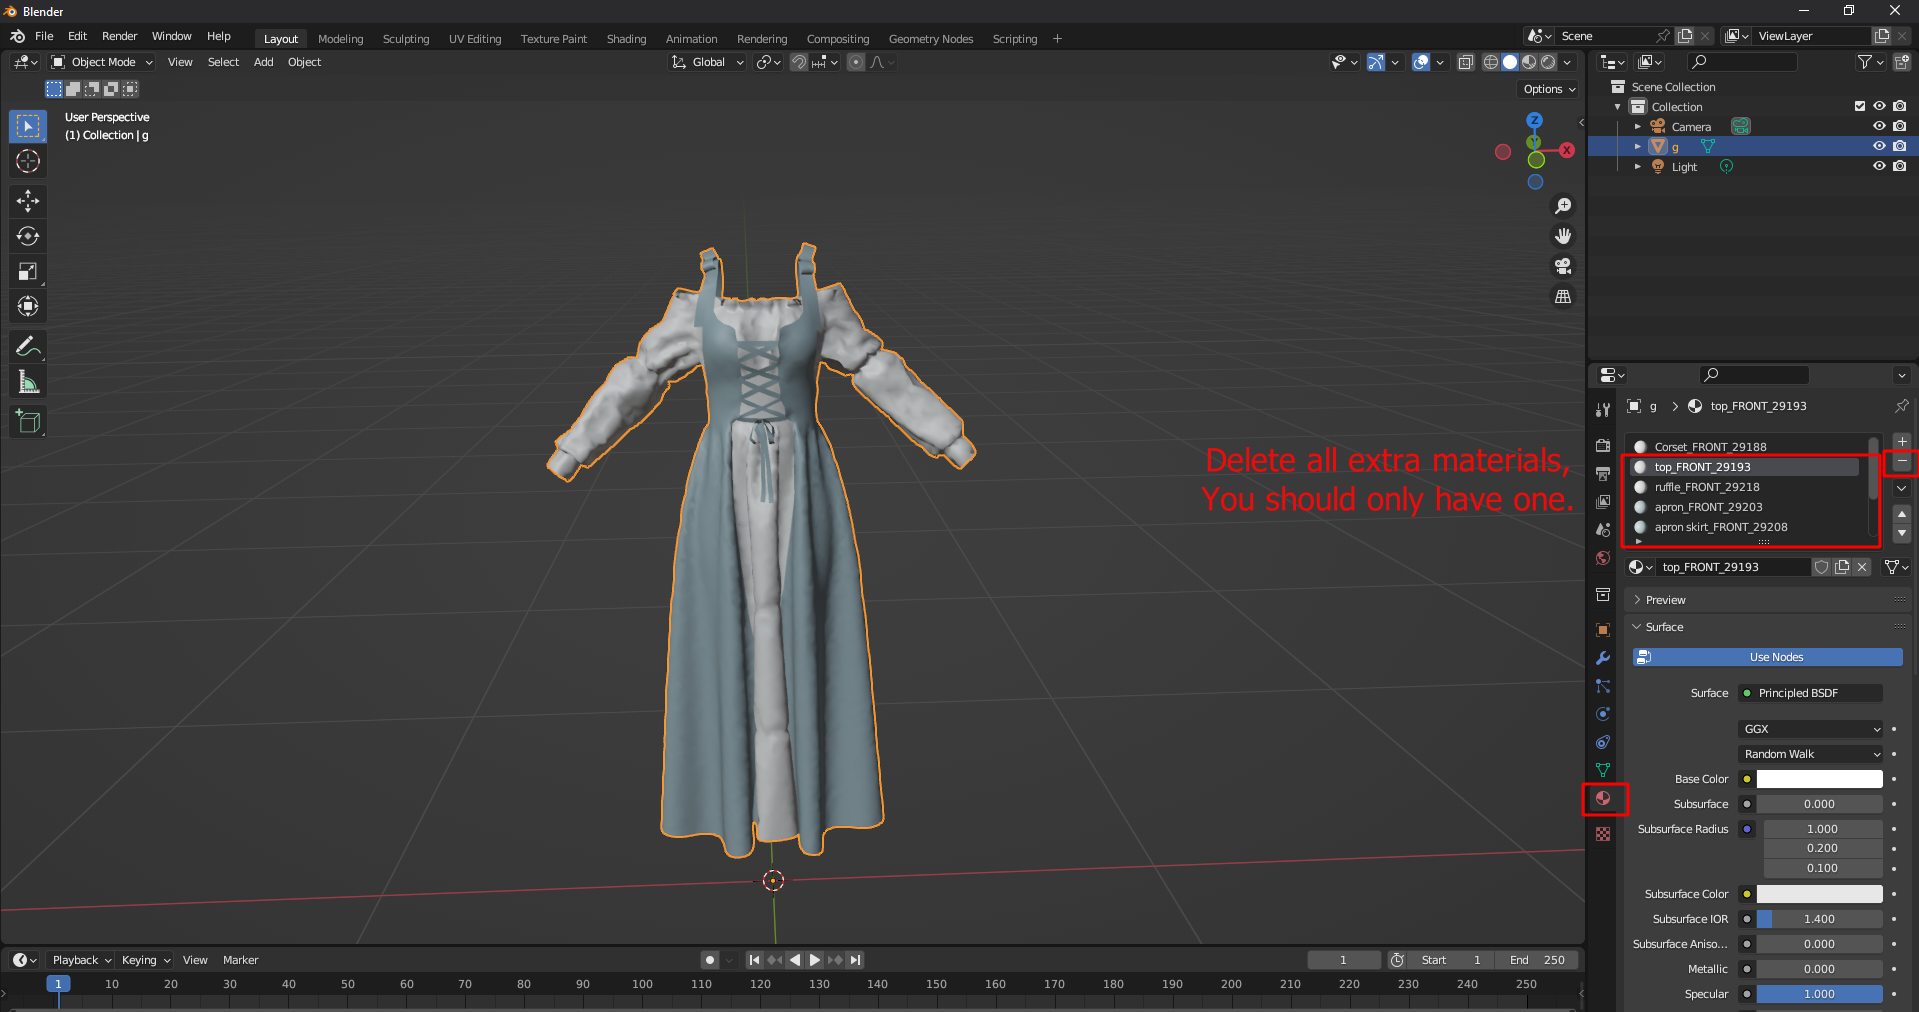
### Step 6: Removing extra material slots
If you had more than one Fabric type (material) you will need to remove them from your FBX in order for it to match sansars single material texture slot. This only needs to be done for your FBX you are using to texture and has no effect on the properties of the imported file. as the .SAMD export does this for you. if you only used one Fabric (material) in MD you can skip this step and use your .FBX right away.
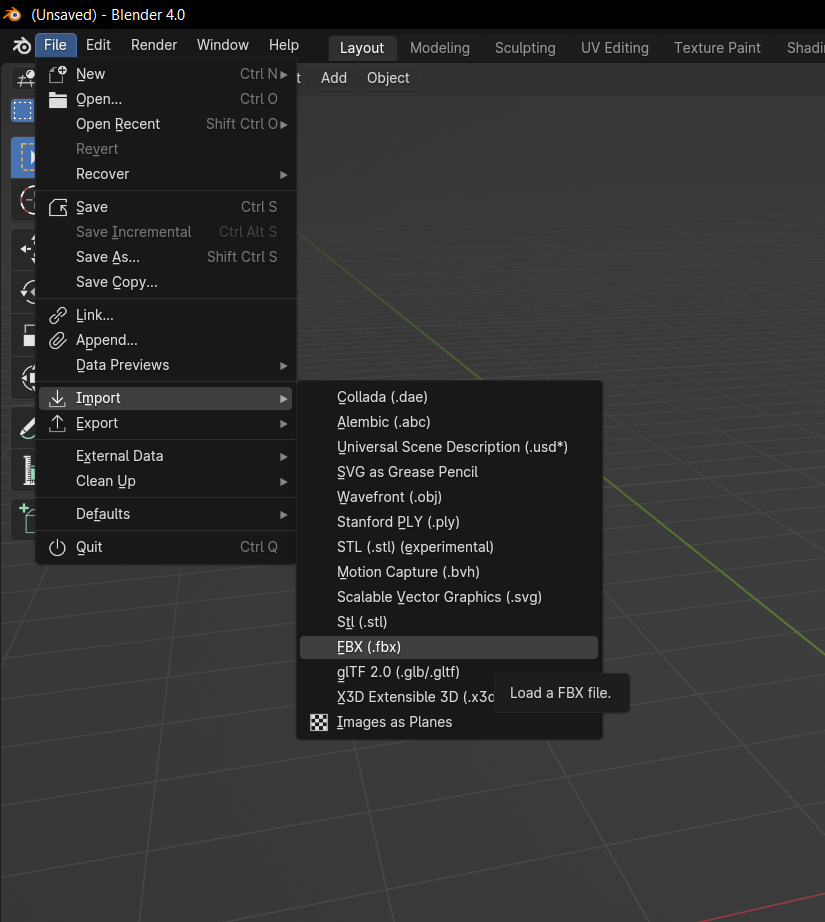
Once exported from MD you can import your .FBX into Blender (or other 3D software)
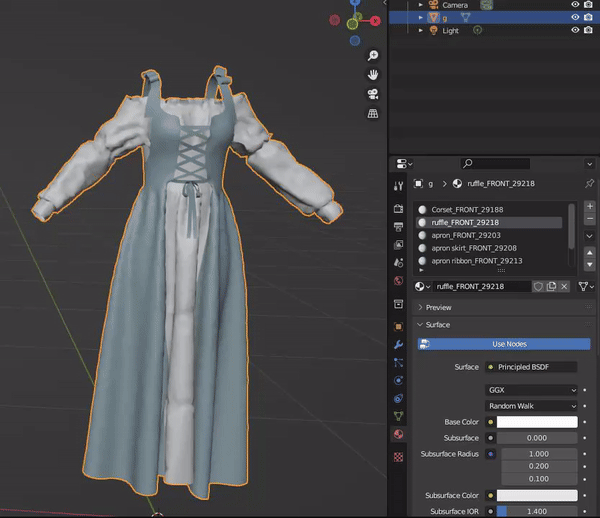
Now select the garment in 'Object mode' (highlights in bright orange), opening the material properties panel on the right and delete all but **one** material slot.
***
### Optional: FBX cleanup
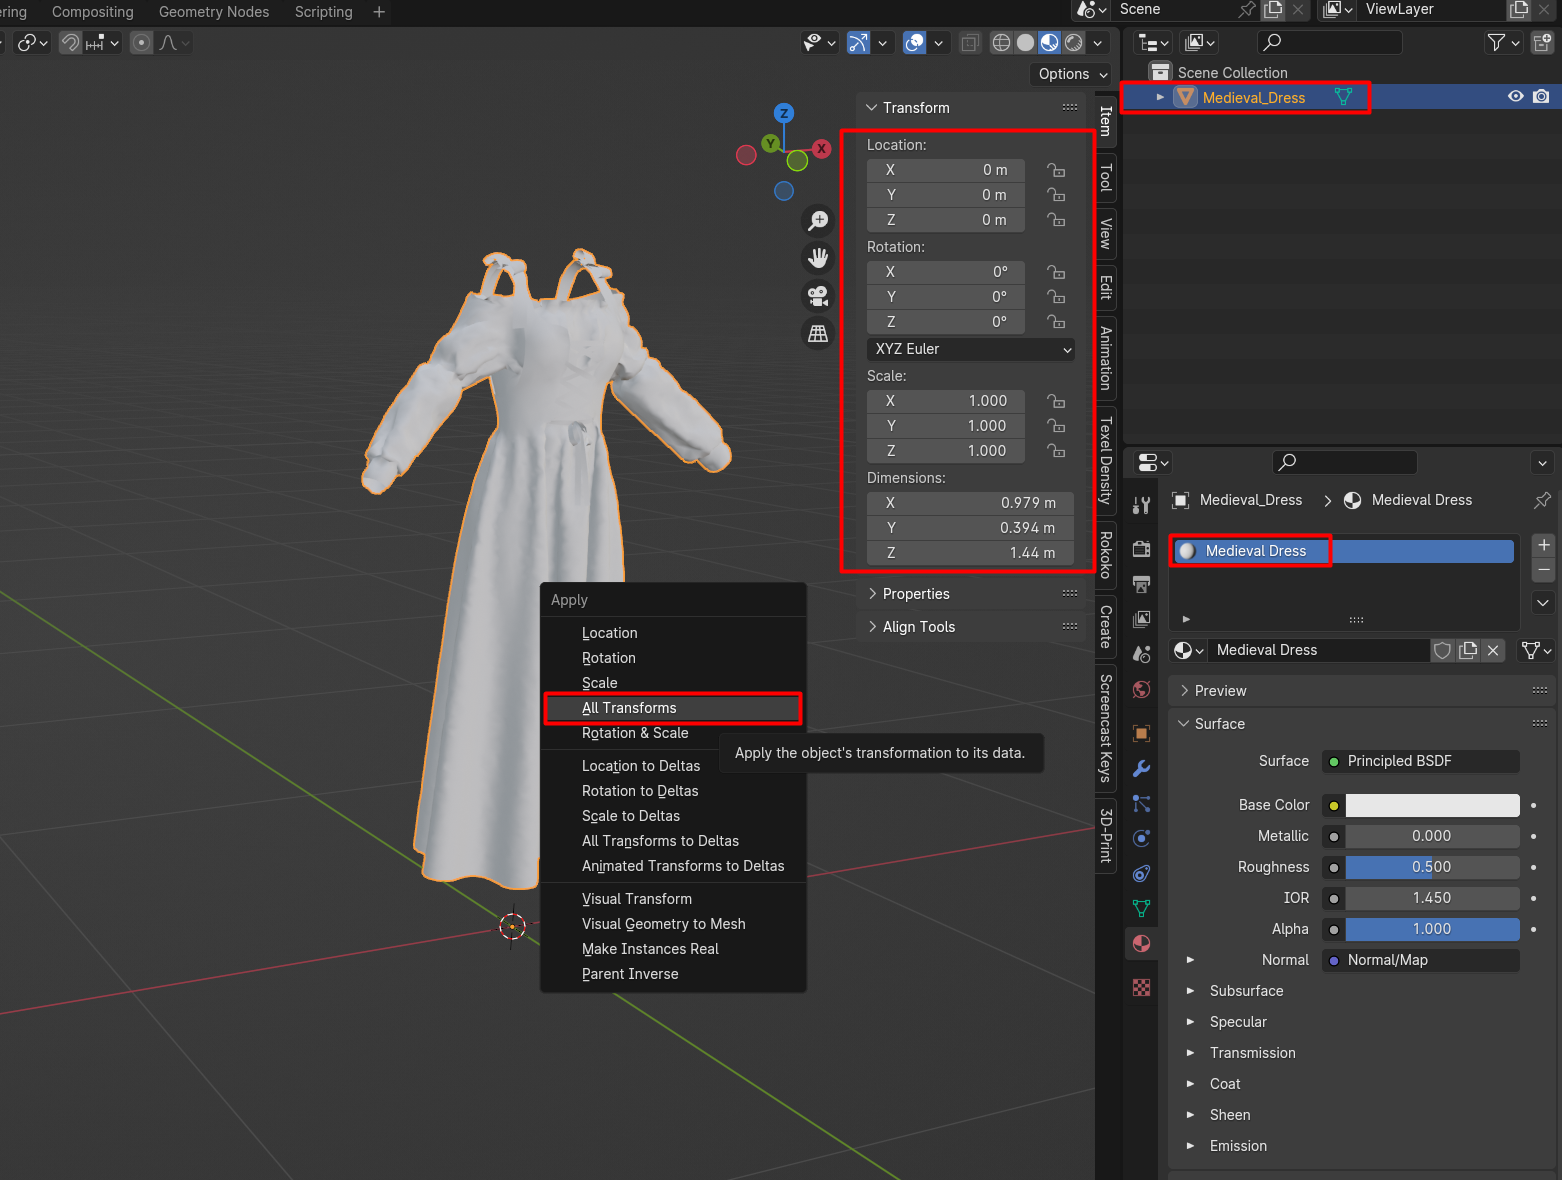
**NOTE:** It is considered good practice to name your mesh and the remaining material slot while here and also apply any scale and rotations that have been picked up along the way by having your object selected and pressing CTRL+A and then apply all transforms. Best done if you intend to import the mesh into edit mode as a in world demo model.
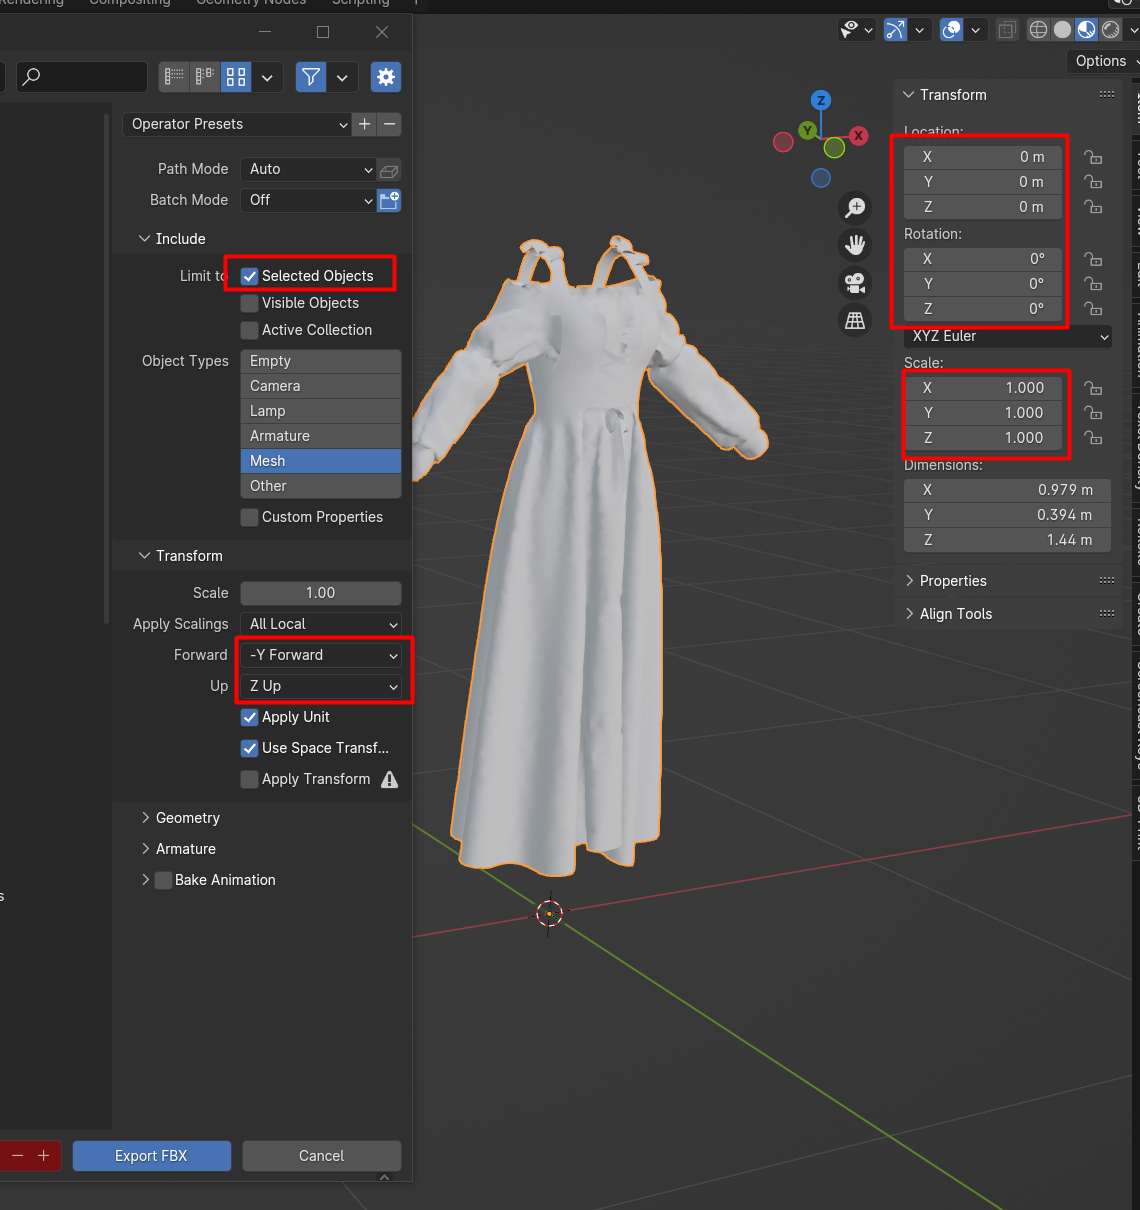
### Step 7: Export single material FBX.
Now with your garment selected you can Re-Export a new .FBX for use in 3D texturing programs like substance painter with a single material slot matching sansars .SAMD material setup. By going to File > Export > FBX then choosing your desired path and the following settings.
Your .FBX is now ready to use for texturing, and matches the .SAMD exports material and UV layout.
**NOTES:**
* It may be a good idea to optimize the garments mesh as it is considered higher poly than needed for a display but not recommended if you are using it to texture as you want the best match to your .SAMD
* This FBX is not used for import to the avatar clothing slots and would require rigging in order to be used on a avatar.
### Importing MD items to Sansar
Coming soon...
Temp info: Import the .SAMD into the clothing slot of the chosen gender in lookbook.